Introduction to Microsoft Paint
 Microsoft
Paint is a simple graphics editing program that is included with Microsoft
Windows. Microsoft
Paint is a simple graphics editing program that is included with Microsoft
Windows.
Although Paint is not very sophisticated,
like the Notepad text editor, you may get stuck someplace where you need
to do graphics editing and all that is avaiable is Paint.
In addition, the features of Paint are
included in most graphics editing programs in more sophisticated form,
so learning Paint is a good introduction to other graphics editing programs.
General Information
 Microsoft
Paint is the default application for processing Windows bitmap files. Bitmaps
are one form of graphics commonly used on computers (most background images
you see are bitmaps). They are generally too large for use on the internet,
however. Microsoft
Paint is the default application for processing Windows bitmap files. Bitmaps
are one form of graphics commonly used on computers (most background images
you see are bitmaps). They are generally too large for use on the internet,
however.
The default file extension of a bitmap
file is .bmp. If you see a file that ends with that, it is a bitmap
image.
Starting Paint
One way to start Paint from the Desktop
is as follows.
-
Select "Start", "Programs",
"Accessories", "Paint".
-
On other computers, the executable file for
Paint is pbrush.exe and is located in the Windows directory, usually
C:\WINDOWS.
Drawing area
 When
started, Paint displays a default drawing area which is called the canvas. When
started, Paint displays a default drawing area which is called the canvas.
Remember that, like in all the other Microsoft
products, if an action is done that is not desired, select "Edit",
"Undo" (shortcut Ctrl-Z) to undo the action.
|
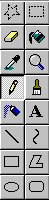 Explanation
of tools on the toolbar: Explanation
of tools on the toolbar:
Selecting and Viewing parts of the picture
 Free-form Select
button Free-form Select
button
-
Used to select areas of the image in any shape.
 Select button Select button
-
Used to select rectangular areas of the image.
NOTE
-
Either of these will select areas to copy,
erase, or fill with color
 Magnifying tool Magnifying tool
-
Zooms in to the picture to see more detail
Drawing Lines
 To draw a straight
line To draw a straight
line
-
In the toolbox, click the straight line
tool.
-
At the bottom of the toolbox, click a line
width.
-
Choose a color for the line.
-
To draw the line, drag the pointer.
-
Draw a perfectly horizontal, vertical, or
diagonal line by holding down SHIFT while dragging.
-
HINT: Use the left mouse button to
draw with the foreground color; use the right mouse button to draw with
the background color.

 To draw a free-form
line To draw a free-form
line
-
In the toolbox, click the pencil
-
To draw the line, drag the pointer.
 To draw a curve To draw a curve
-
In the toolbox, click the curved line
tool
-
At the bottom of the toolbox, click a line
width.
-
Draw a straight line by dragging the pointer.
-
Click where you want one arc of the curve
to be, and then drag the pointer to adjust the curve. Repeat this step
for a second arc.
-
Each curve must have at least one arc but
no more than two.
 To draw an ellipse
or circle To draw an ellipse
or circle
-
In the toolbox, click the picture of
the oval .
-
Drag the pointer diagonally.
-
You can draw a perfect circle by holding down
SHIFT while you drag.
-
You can color it in by clicking a fill
style at the bottom of the toolbox. Click a new color in the color
box to change the line color, or right-click a new color to change the
fill color.
 To draw a rectangle
or square To draw a rectangle
or square
-
 In
the toolbox, click the square to create a square-cornered
shape, or click the rounded edge square to create a round-cornered
shape. In
the toolbox, click the square to create a square-cornered
shape, or click the rounded edge square to create a round-cornered
shape.
-
To draw a rectangle, drag the pointer diagonally
in the direction you want.
-
To draw a square, hold down SHIFT while dragging
the pointer.
-
You can create a colored fill by clicking
a fill style at the bottom of the toolbox.
-
The border width of the box is the same as
the thickness selected for the line tools. To change the border thickness,
click the line or curve tool in the toolbox, and then click the
thickness you want in the box below the toolbox.
 To draw a polygon
(a shape with many sides) To draw a polygon
(a shape with many sides)
-
In the toolbox, click on the polygon
tool.
-
To draw the polygon, drag the pointer and
click at each corner, and then double-click when done.
-
To use only 45- and 90-degree angles, hold
down SHIFT while dragging.
 To add Text To add Text
-
Make sure the foreground color is the color
you want to write in.
-
Click on the Text tool.
-
Drag a text box across the picture.
-
Type the text you want.
-
Click on VIEW, TEXT TOOLBAR to change the
font and size.
-
MAKE SURE you have it exactly right before
you click off the text box. Once you have added text, you CAN NOT erase
it.
Using Colors
To set the foreground and background colors
-
To set the foreground color click a color
in the color box.
-
To set the background color right-click a
color in the color box.
-
The colors selected appear at the left in
the color box. The top color is the foreground color. The bottom color
is the background color.
 To pick a color
(from an image that has colors already) To pick a color
(from an image that has colors already)
-
In the toolbox, click on the Eyedropper.
-
Click on the desired color in the image.
-
Notice how that color then becomes the foreground
color.
 To fill an area
or object with color To fill an area
or object with color
-
In the toolbox, click on the paint can.
-
Click the area or object you want to color.
Notes
-
If the shape being filled has any gaps in
its border, the color leaks through to the rest of the drawing area. You
can find and close any openings by clicking the View menu, pointing
to Zoom, and then clicking Large Size or Custom.
-
The default background and foreground colors
appear at the left in the color box. You can fill with the foreground color
by clicking, or you can fill with the background color by right-clicking.
 To paint with
a brush To paint with
a brush
-
In the toolbox, click the paintbrush.
-
At the bottom of the toolbox, click a brush
shape.
-
To paint, drag the pointer.
 To create an
airbrush effect To create an
airbrush effect
-
In the toolbox, click the can of spray
paint.
-
At the bottom of the toolbox, click a spray
size.
-
To spray, drag the pointer.
Erasing
 To erase a small
area To erase a small
area
-
In the toolbox, click on the eraser
.
-
At the bottom of the toolbox, click an eraser
shape.
-
Drag the pointer over the area you want to
erase.
Notes
-
The selected background color shows what color
the eraser will leave behind. You can change the background color by right-clicking
another color in the color box.
To
erase a large area
-
In the toolbox, click the rectangle
to select a rectangular area or click the polygon shape to
select a free-form area.
-
Drag the pointer to select the area you want
to erase.
-
On the Edit menu, click Clear Selection.
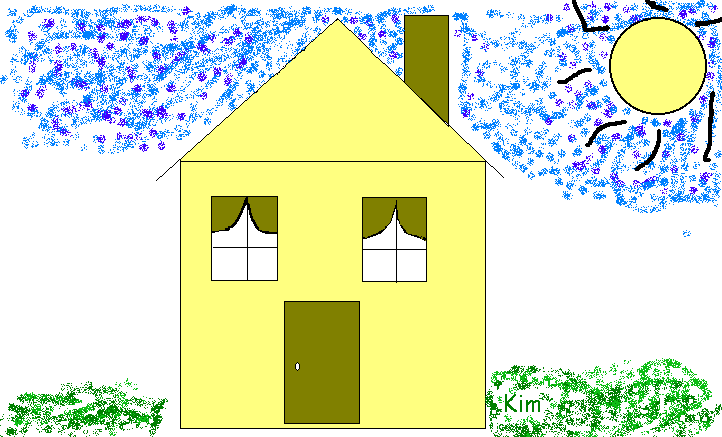
Activity: Using Microsoft Paint
Complete the following picture. Be sure
to follow the steps below. Check them off as you complete them. Follow
the directions for erasing if you make a mistake. Remember that you
can always undo whatever new part you just added to your picture.
And you can start over by going to "NEW".
Draw a house.
-
Use the square tool to make the house.
-
Use the straight line tool to make a roof
on the house.
-
Use the polygon tool to make a chimney.
-
Use the square and the straight line tool
to make windows.
-
Use the curved line tool to add curtains to
the windows.
-
Put a sun in the sky. Use the circle tool.
-
Put rays around the sun using the pencil tool.
-
Color the sky blue with the airbrush.
-
Color the sun yellow with the paint can.
-
Paint the curtains with the paint brush.
-
Use the paint can to color the house. * If
your whole picture changes colors, go to VIEW<ZOOM<LARGE to see where
the paint is leaking. It means that one of your lines isnt connected all
the way.
-
Write your name with the text key (A).
Choose a style and color that you like.
-
Save.
|