Word 97, Lesson 3
Document Formatting
What you will learn from this lesson
How to:
-
Establish page margins and paper size.
-
Determine layout style.
-
Maneuver around your document.
-
Enter, copy, and edit text.
-
Use the Undo and Redo commands.
-
Search for text and replace it.
-
Use a split screen.
-
Insert symbols.
-
Insert headers and footers.
-
Insert fields, current dates, and page numbers.
-
Insert page breaks.
-
Format text into columns.
-
Insert a table.
-
Move data in a table.
-
Modify cells in a table.
-
Enhance a page with artistic borders.
What you should do before you start this lesson
 Start
Word 97 Start
Word 97
 Open
a new document Open
a new document
Exploring the lesson
As you master the tasks in this section,
you will continue using them in subsequent lessons. Don't erase
any of the documents: SAVE EVERYTHING!!
 Doing
all sorts of paper formatting: Assignment #6 Doing
all sorts of paper formatting: Assignment #6
Establishing the margins
Each document can have different margins,
depending on the type of paper you plan to use. For example, letterhead
can have graphics on the top, the side, or the bottom; you'll want to adjust
your margins to ensure that the text of your letter does not print in the
area of the paper with graphics.
Establishing the margins
-
Open a new document
-
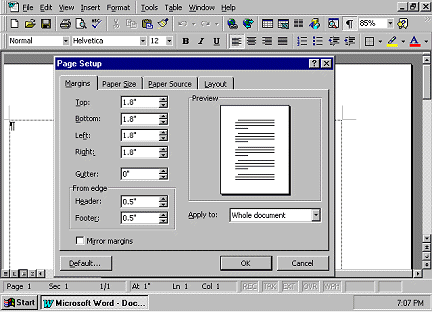
On the File menu, click Page Setup.
-
Click the Margins tab.
-
Change the Top, Bottom, Left, and Right margins
to 1.8" by clicking the small up and down arrows.
-
In the Apply to box, click Whole document.
-
Look at the image in the Preview area to view
the margins.
-
Click OK.
Establishing layout for one document
At times you may write a letter with a different
layout or orientation than usual. You may want to send postcards that you
design, placing four to a page, or use a horizontal page layout to use
in a class project.
 Setting
the paper size and orientation Setting
the paper size and orientation
-
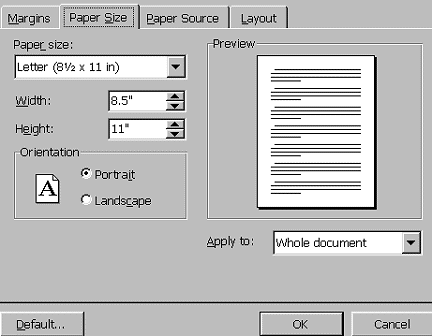
On the File menu, click Page Setup.
-
Click the Paper Size tab.
-
Click the Landscape button to select a horizontal
orientation, and then click the Portrait button to change the orientation
back to vertical.
-
In the Paper size box, select Letter 8½
x 11 in.
-
Look at the image in the Preview area to verify
orientation.
-
Click OK.

Moving around in your document
There are different ways to move around in
your document. One way is to use the scroll bars, and another way is with
the keyboard. Using keys (such as home, page up, page down), you can move
quickly through your document as you write and edit.
Moving with scroll bars
-
Click in the vertical scroll bar on the right
side of the screen.
-
In the vertical scroll bar, click the scroll
box, and drag it up and down.
-
In the horizontal scroll bar, click the scroll
box, and drag it to the right and left.
Moving with special keys
-
Click anywhere in the document, and press
home to move to the start of a line.
-
Click anywhere in the document, and press
end to move to the end of a line.

Entering and modifying text
Entering and modifying text is also very
easy in Word 97. To enter text, just start typing. The following lessons
look at how you replace, delete, and copy text.
Replacing one word
-
Type The quick blue fox jumps over the lazy
dog.
-
Place the cursor in the word blue.
-
Double-click to select the word.
-
Type brown.
Replacing one sentence
-
Type Silver bells and cockleshells.
-
Press home to move the cursor to the beginning
of the sentence.
-
Select the entire sentence.
-
Type Mary, Mary, quite contrary.
-
Now click 3 times quickly.
-
Type Hickory Dickory Dock
Deleting text with special keys
-
Type: Little Miss Muffett sat on a tuffet
footstool from ABC-Store.
-
Position the cursor after Muffett.
-
Press backspace to remove the last letter.
-
Position the cursor after ABC-Store.
-
Press backspace to delete Store.
-
Position the cursor between footstool and
from.
-
Press delete to delete from.
-
Position the cursor after tuffet.
-
Delete footstool one character at a time with
the delete key.
Copying text
-
Type Among all the teachers at Escuela Internacional
Sampedrana, Mr. Stutz rules the roost while Mr. Von Pappen curses at his
classes.
-
Select Mr. Stutz rules.
-
Select Edit, copy (or control-c) to
copy the selected text.
-
Position the cursor at the end of the phrase
you just typed.
-
Select Edit, paste (or control-v) to
paste the copied material.
-
Select Edit, paste (or control-v) to
paste the copied text again.
-
Select Edit, paste (or control-v) to
paste the copied text again.
-
Select Mr. Von Pappen curses.
-
Select Edit, cut (or control-x) to
cut it.
-
Position the cursor at the end of the line.
-
Select Edit, paste (or control-v) to
paste the words you just deleted.
-
Save the file, and name it Assignment6.
Save it again to your folder.

Using the Undo and Redo functions
If you insert or change text in your document
and then want to cancel the insertion, use the Undo command. The Undo function
remembers the steps that you have done in the document since you opened
it.
Undo toolbar button
-
Open a new document.
-
Type My Grades, Projects Evaluated, Winter
Quarter, and Vacation Plans on separate lines.
-
Position the cursor anywhere in the second
line.
-
On the Formatting toolbar, click the Increase
Indent (the picture with the black bars and the arrow) button.
-
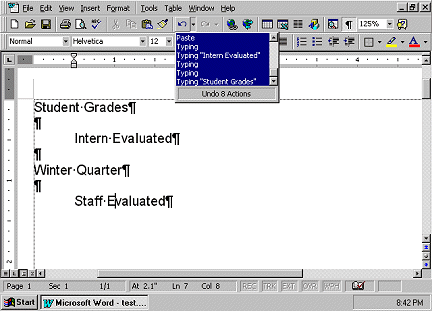
On the Standard toolbar, click the arrow next
to the Undo (a spiral arrow) button, and scroll down to the end of the
list. Click the last item to undo all the tasks on the list.
Redo toolbar button
-
On the Standard toolbar, click and drag the
Redo arrow to the end of the list, and redo the actions you undid in the
previous step.
-
Close the document without saving changes.
Finding and replacing text
The Find and Replace features in Word 97 are
used to locate and replace specific text, punctuation, or special characters
within a document. You can even find words that sound like other words,
which makes it easy to find words even when they are misspelled or you
are unsure of the exact spelling.
-
On the File menu, click Assignment6.
-
On the Edit menu, click Find.
– or –
Press ctrl+f.
-
In the Find and Replace dialog box, click
More to see more search options.
-
Type Merry in the Find what dialog box.
-
Click Sounds like to find words that sound
like Merry.
-
Click Find Next to begin your search.
-
Click Cancel to close the Find and Replace
box.
-
Close the document without saving changes.

Inserting symbols
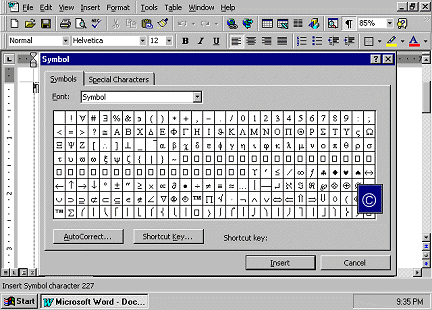
Word 97 offers a wide range of symbols
that you can use in your documents. You can easily enter mathematical formulas,
Greek letters, and other symbols using the Symbol command.
Inserting symbols with the Symbol command (assignment #7)
-
Open a new document.
-
On the Insert menu, click Symbol.
-
Click a symbol you'd like to insert into your
document, and then click Insert.
-
Click the Special Characters tab to see other
symbols that you can insert.
-
Click Close to return to your document.
-
Make a really pretty document with all sorts
of different symbols and name it symbol. Don't close it, though.

Inserting fields
You can insert fields into your document to
serve as placeholders for data or information that may change, such as
page numbers, file names, and dates.
Headers and footers contain information
that repeats from page to page within a document. You can easily insert
fields in the header or footer on each page—the most common field used
in headers and footers is the page number. The Page Setup command on the
File menu controls the appearance of headers and footers. A document can
have different headers for odd and even pages. For example, you can set
it up so that the page number appears on the right on odd numbered pages,
and on the left on even numbered pages.
Inserting headers and footers
-
On the View menu, click Header and Footer.
-
Move the cursor over on each button on the
Header and Footer toolbar to reveal its function.
-
Click the Switch between header and footer
button.
-
Click the Insert Page Number button.
Inserting dates
You can insert a date field that automatically
updates to the current date each time you open the document. For instance,
if you create a template for letters to parents, you can place the date
field in the header. Then, each time you write a new letter, it will automatically
have the correct date.
-
(You should still be working in the symbol
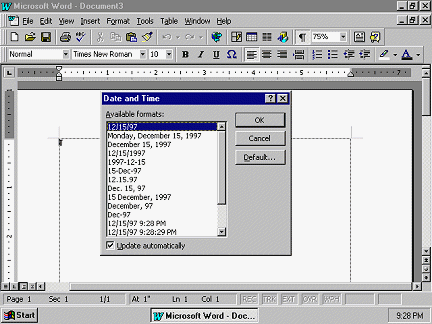
document) On the Insert menu, click Date and Time.
-
Click date in month/date/year format.
-
Click the Update automatically check box to
have Word 97 insert the current date each time the document is opened.
-
Click OK.
-
Close the document and save changes.
End assignment #7.

Inserting breaks
You can insert different types of breaks
in Word 97. A page break, the most common kind of break, puts a manual
break in your document and continues the document on the next page.
-
Open symbol.
-
Position the cursor in the middle of the document.
-
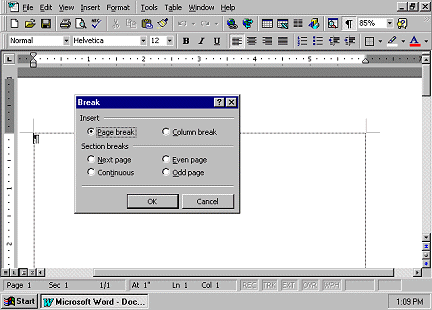
On the Insert menu, click Break.
-
Click Page Break, and then click OK.
-
Close the document without saving changes.
Assignment #8
Inserting tables
Tables add interest and clarity.
Use tables to organize information into a grid made up of cells. Each cell
in a table can contain elements such as text, numbers, complex graphics,
bulleted lists, numbering, fields, and hanging indents.
You can easily insert tables into your
Word 97 document or PowerPoint presentation. For complex calculations and
statistical analysis, you may prefer to use Microsoft Excel 97. (We will
be learning more about these during the course of the year)
Inserting a table with Draw Table
Using Word 97, you can draw a table, determine
its boundaries, add distinctive color and varying line styles, and place
text horizontally and vertically.
Open a new document.
On the Table menu, click Draw Table. The Draw
Table pen appears on the desktop.
Using the mouse, drag the Draw Table pen diagonally
across the screen to draw the outside of the table.
Using the Draw Table pen, draw three vertical
and six horizontal lines in the table.
On the Tables and Borders toolbar, click the
Eraser button, and erase the three middle horizontal lines by clicking
and dragging the eraser across the lines.
On the Table menu, click Select Table.
On the Tables and Borders toolbar, click the
Distribute Rows Evenly button to rearrange the horizontal lines.
On the Tables and Borders toolbar, click the
Border Color button, select a color, and drag the Draw Table pen across
the middle vertical line.
Type Player Name in the top left cell.
On the Tables and Borders toolbar, click the
Center Vertically button.
On the Standard toolbar, click the Align Left
button, and then click the Align Right button.
Save as table1, but don't close the
document.
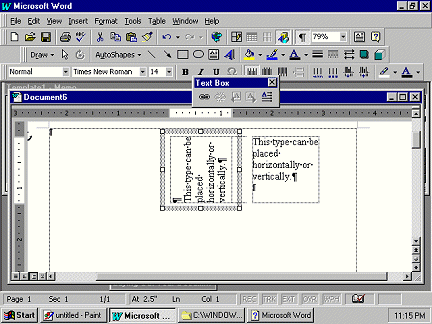
There are many advantages to being able
to create your own table or chart. Using the features on the Tables and
Borders toolbar, you can customize your material to fit your exact requirements.
Inserting tables with the Table menu
Using Word 97, you can modify the size of
the cells in a table.
-
On the Table menu, click Insert Table. (You
have to be completely out of the previous table to do this. Put the cursor
after the table and hit Enter a few times)
-
Set the number of columns to 4, the number
of rows to 3, and the column width to Auto.
-
Click AutoFormat.
-
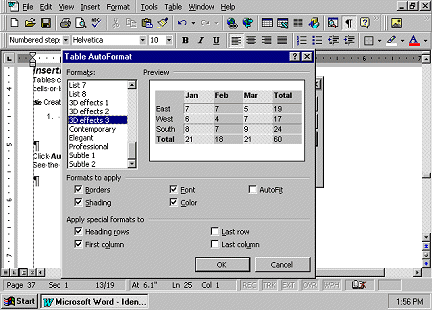
In the Table AutoFormat dialog box, under
Formats, click 3D effects 3.
-
Click OK to close the Table AutoFormat window.
-
Click OK to close the Insert Table dialog
box and insert the table in your document.
-
Save your work
End Assignment #8

Assignment #9
Moving around inside a table
In a table,
a row is horizontal, and a column
is vertical. The following lessons
explain how you can move around in a table using the mouse and how to enter
text and then copy, paste, and change that text within the table.
Selecting cells
-
Open your document table1
-
Position the mouse pointer in the lower-left
corner of any cell.
-
Click to select that one cell.
-
Position the pointer at the start of a row,
and click to select that row.
-
Position the pointer at the top of a column.
The mouse pointer will turn into a down arrow. Click to select that column.
-
You can select adjacent columns and rows by
dragging the pointer across the additional cells you want to select.
Changing lines inside tables
The standard table may not be sized according
to your needs. If the information you enter does not fit into one cell
of the column, Word 97 makes the text fit by creating a second line of
text. This may not be what you want.
Changing column size to fit your text
-
Type the following lines into your table:
| Player |
Free Throws |
Field Goals |
3-Pointers |
| Wells, Joseph Frazier Reginald |
3/10 |
94% |
93% |
| Crowley, Goering Jameson Lepetomaine |
7/10 |
94% |
93% |
| Stutz, David Joseph Lanny |
10/10 |
90% |
98% |
-
(If you need to add extra rows, do it by clicking
on Table, Insert Row)
-
Position the mouse pointer on the vertical
line between the Player and Free Throws columns until the pointer becomes
this symbol:

-
Click and drag the vertical line to the right
until each name fits on one line.
-
Position the pointer on the vertical line
between the Free Throws and Field Goals columns.
-
Click and drag the vertical line to the right
until Free Throws fits on one line.
-
If necessary, repeat this procedure for the
Field Goals and 3-Pointers columns.
-
Save this document as table2
End Assignment #9
 There are other powerful and intuitive tools
in Word 97 that help you add personal touches, humor, and special messages
to your documents.
Adding graphics with shortcut keys (Assignment #10)
You can easily add symbols to your documents,
just by using the keyboard.
Adding symbols to your text
-
Open a new document.
-
Type a colon followed by a close parenthesis—:)
—and watch what happens. A happy face will appear.
-
Select the image, and press ctrl+] to increase
the point size by one point at a time. Increase the size of the image to
18 points.
-
Type a colon followed by an open parenthesis—:(
—to see what appears.
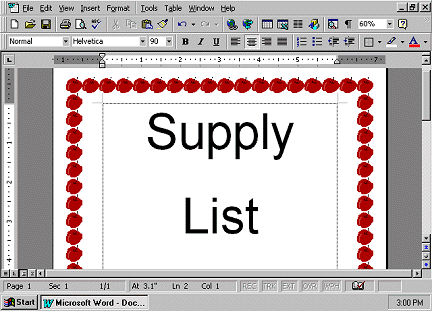
Formatting artistic borders
Using Word 97 you can easily add a border
to a document or create designs that enhance your assignments.
Adding decorative page borders
-
Type Supply List.
-
Position the cursor anywhere in the text.
On the Formatting toolbar, click the Center button.
-
Select the words "Supply List."
-
In the Font Size box on the Formatting toolbar,
type 90. Press enter.
-
From the Format menu, click Borders and Shading.
-
Click the Page Border tab.
-
Click Custom.
-
Click the Art arrow, and select a border from
the list.
-
Click OK.
Pretty cool, huh?
Save as assignment10
Summarizing what you have learned
Through this chapter, you have explored and
practiced:
-
Establishing page margin and paper size.
-
Choosing layout style.
-
Maneuvering around your document.
-
Entering, copying, and editing text.
-
Using Undo and Redo.
-
Finding and replacing text.
-
Inserting symbols.
-
Inserting headers and footers.
-
Inserting fields, current dates, and page
numbers.
-
Inserting page breaks.
-
Inserting a table.
-
Moving data in a table.
-
Modifying cells in a table.
-
Adding borders.
|


